A sidebar app is a panel in the ticket sidebar whose contents come from your backend. The dashboard calls your endpoint with the context of the conversation, and you return what should be shown. It's how an agent sees the customer's subscription, their last order or their account state from your own system without leaving the ticket, and acts on it without opening your admin tool. Only project admins can set one up.
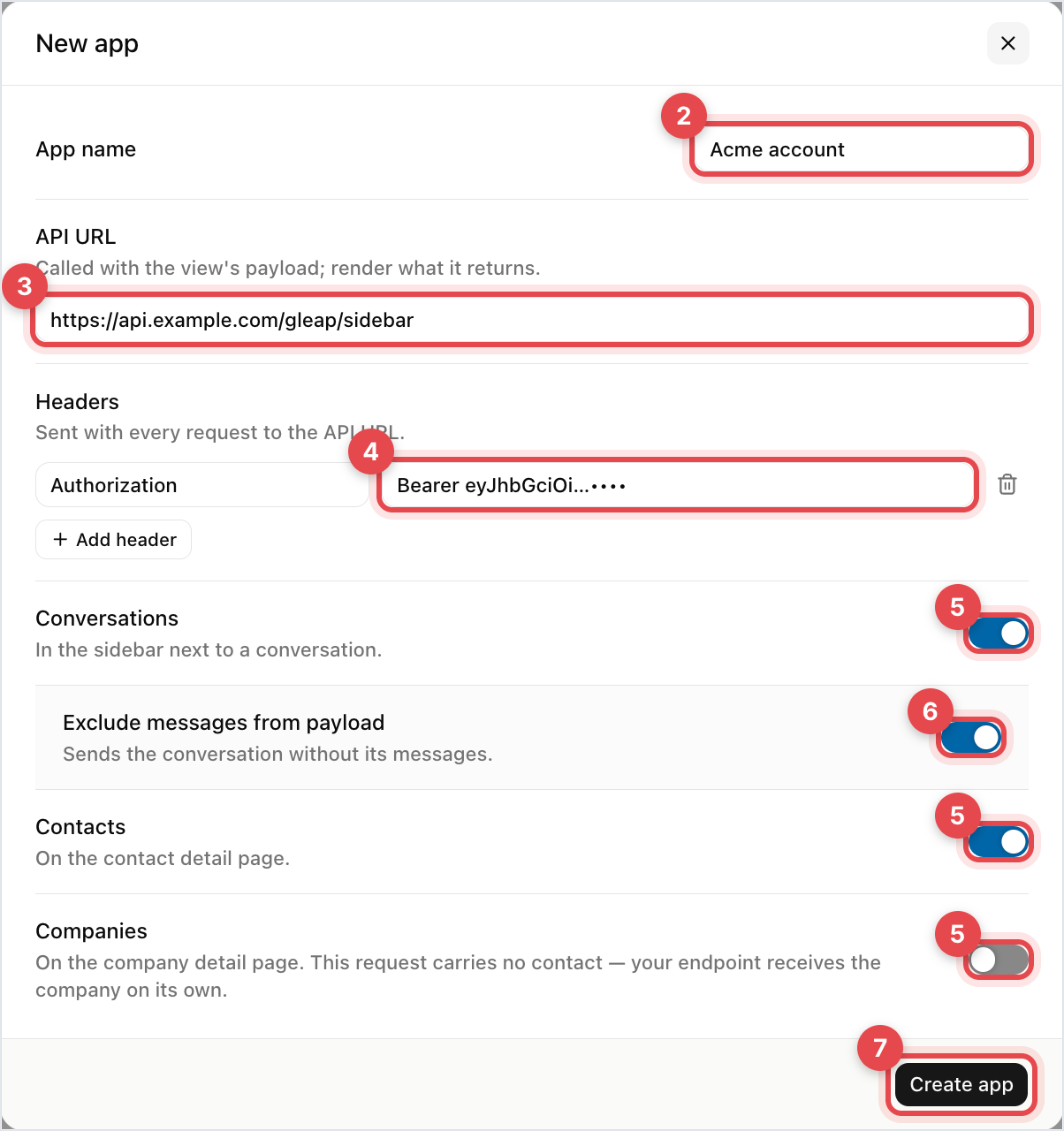
Go to Settings → Developer → Sidebar apps and click Add app. The New app dialog opens.
Enter the App name: the panel heading your agents see.
Enter the API URL of your endpoint.
Add Headers sent with every request, usually an Authorization header so you can tell the call really comes from your dashboard.
Choose where it shows: Conversations, Contacts and Companies. New apps start with Conversations and Contacts on, and at least one must stay on.
Under Conversations, turn on Exclude messages from payload unless your endpoint genuinely needs the conversation. It keeps the ticket and its messages out of the request, and makes the payload smaller.
Click Create app.
You can add several apps; each one renders as its own panel. Open a ticket to check it: the panel loads with what your endpoint returned.
When a ticket opens, the agent's browser makes a POST to your API URL with your headers and Content-Type: application/json. Because the call comes from the browser, your endpoint has to accept cross-origin requests (CORS) from the dashboard, and your headers are visible to anyone on your team who inspects the request. While the ticket stays open, new activity refreshes the panel at most every five seconds. For a conversation, the body carries:
surface: TICKET, CONTACT or COMPANY, so one endpoint can serve every view
session: the contact, with name, email, userId and customData
ticketId and ticket: the conversation. ticket is left out when Exclude messages from payload is on
user: the teammate looking at the panel, not the customer
company: the contact's company, when it has one
{
  "surface": "TICKET",
  "user": {
    "email": "[email protected]",
    "firstName": "Anna",
    "lastName": "Lee"
  },
  "session": {
    "name": "Max Smith",
    "email": "[email protected]",
    "userId": "A-1042",
    "customData": {
      "plan": "pro"
    }
  },
  "ticketId": "6a7c…",
  "ticket": {
    "id": "6a7c…",
    "status": "OPEN"
  }
}
On a contact page the body has the same keys without ticketId and ticket. On a company page it carries only surface, user and company.
Authenticate the call with the header you set, then key off the contact's email, or the user ID you passed at identification, to fetch their record.
Respond with a 2xx status and a JSON object whose content is a list of items:
Type | What it shows |
|---|---|
| A line of text, in |
| Label and value pairs in |
| An image, by URL in |
| An action, in |
| Fields the agent fills in and submits back to you, in |
| Raw HTML in |
{
  "content": [
    { "type": "text", "text": "Pro plan · renews 12 Mar 2026" },
    {
      "type": "key-value",
      "keyValue": [
        { "key": "MRR", "value": "$49" },
        { "key": "Status", "value": "Active" }
      ]
    },
    { "type": "image", "image": "https://acme.com/avatar/1042.png" }
  ]
}
Prefer key-value over html where you can. It inherits Gleap's styling, so it keeps looking right when the dashboard changes. HTML is inserted into the dashboard as it is, without sanitising, so only return markup you control. Items of any other type are not shown.
A button either opens a URL or makes an HTTP request back to you, with a method, headers and body you define, and success and error messages the agent sees. On a POST, the body also carries the same context your API URL received, unless you set includeContext to false. That's the difference between a sidebar that shows a subscription and one that can extend a trial.
{
  "type": "button",
  "button": {
    "label": "Extend trial 14 days",
    "action": "http-request",
    "url": "https://acme.com/gleap/extend",
    "method": "POST",
    "headers": [{ "key": "Authorization", "value": "Bearer …" }],
    "body": { "accountId": "A-1042", "days": 14 },
    "successMessage": "Trial extended to 26 Mar.",
    "errorMessage": "Couldn't extend. Do it from the admin tool."
  }
}
For a plain link, set action to open-url or leave it out: the button opens its url in a new tab.
A form takes it further: text, textarea, select, radio, checkbox, number and date fields, submitted to the url you specify. Each field has a name, and the values arrive at your endpoint under formData. Use it when the action needs input, like a refund amount or a reason code.
{
  "type": "form",
  "form": {
    "url": "https://acme.com/gleap/refund",
    "submitLabel": "Refund",
    "fields": [
      { "type": "number", "name": "amount", "label": "Refund amount", "required": true },
      {
        "type": "select",
        "name": "reason",
        "label": "Reason",
        "options": [
          { "label": "Duplicate", "value": "duplicate" },
          { "label": "Faulty", "value": "faulty" },
          { "label": "Goodwill", "value": "goodwill" }
        ]
      }
    ]
  }
}
Keep it fast. The panel loads when the ticket opens, so a slow endpoint is felt on every single conversation. Cache on your side rather than querying three systems per request.
Handle "not found" gracefully. Plenty of contacts won't exist in your system, and a short "no account" line reads better than an empty panel or an error.
Show what changes the answer, like plan, status and last invoice, not everything you have. A sidebar with thirty fields gets scrolled past.